
JTB Rebar - DetailBeam
How it works
General Usage Instructions
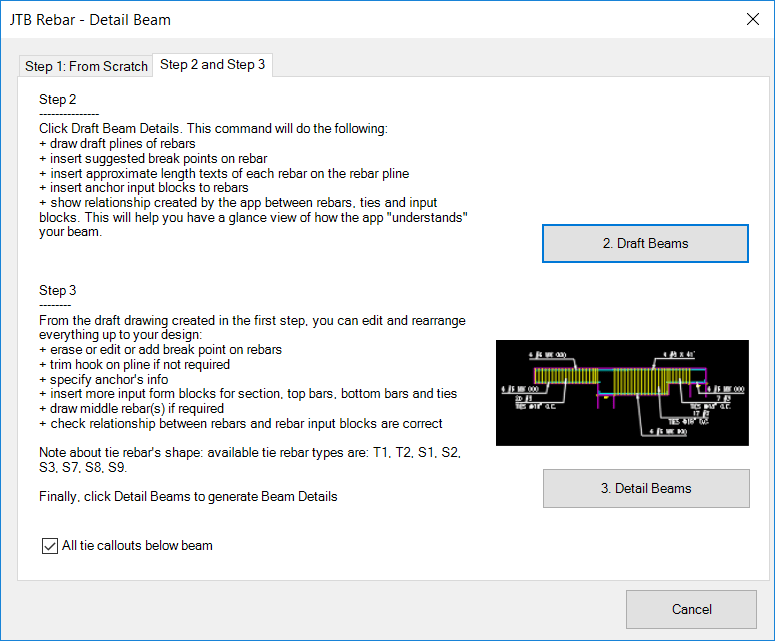
The Detail Beam window has 2 command buttons: Draft Beam and Detail Beam
Draft Beam draws rebars base on your beam's elevation polyline. Rebar will have hook at corner, unless noted otherwise.
Draft Beam also insert anchors, break points block at possible positions on the rebar.
Detail Beam make the final drawing.
All the workload you have to do is making the draft drawing. You have to arrange concrete information, rebar information, anchor and break information blocks to the right positions of the beam's design. The rest of the work just a click to run the Detail Beam command button.
Following section focus on the draft drawing.
Draft Beam - Setup The Input For Detail Beam
The unique feature of DetailBeam command is, you sketch a simple draft drawing of the beam, then JTB Rebar will make the detail beam drawing base on your sketch.
To make this, draft drawing must be created using JTB Rebar "Input Beam *" blocks.
1. Drawing should be within the Input Beam Detailing block, which is like a canvas
You can always insert this canvas block from the first tab of DetailBeam window:
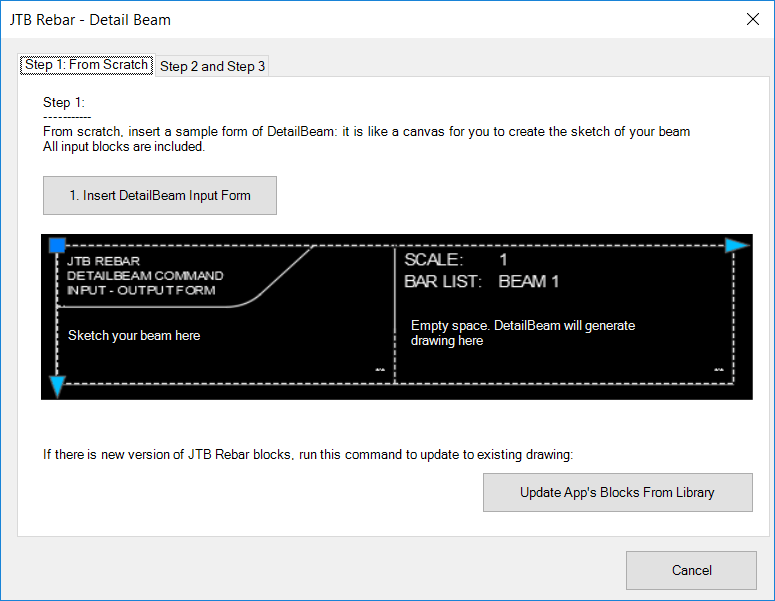
This is a dynamic block that can extend its width and height for making a longer multi-span beam.
It is divided in two frames. Let's call them 2 canvas:
It also has attributes:
After "Insert DetailBeam Input Form", you will have a sample of it with instruction attached on each item, as following image.
2. The Drafting Canvas
Click on items in the following screenshot to see instruction:
 Here is the result of DetailBeam from above drafting drawing
1. Beam's elevation polyline
Beam's elevation polyline must be one orthogonal polyline drawn on layer "Concrete". Top and bottom rebars will be generated later by the app based on this polyline.
2. Top and Bottom Rebars
As noted above, top and bottom rebars are generated by the app once you have the beam elevation polyline. A rebar can have hook, anchor and break point on it.
At "closing" corner, rebars drawn by the app will have hook. Hook's length is just for illustration, will be corrected later by Detail Beam command according to rebar diameter. You can trim the hook from the polyline if it is not required.
At "opening" corner, anchor block is placed. The anchor length drawn is just for illustration, will be corrected later by Detail Beam command according to ANCHOR attribute and rebar diameter.
Therefore, relative length is calculated according to the rebar nature, not the current Unit Setting. This rule is also applied to other length, like splice length.
Break point is placed where rebar should be cut and splice. It is just a simple block, no attribute. Splice length is calculated according to the rebar itself. See SPLICE attribute in Rebar Input block.
3. Middle Rebar
Middle rebar, or custom rebar is manually drawn, must be one polyline in "Rebars" layer. A rebar input block should be placed over this. It can have hooks, and/or anchor, break point on it (also manually drawn).
4. Rebar Input Block
Rebar Input Block holds information about rebar. Block's name is actually "Input Beam Rebar", just because "Input Beam" prefix is a must to sort these input blocks by name.
The app "reads" the draft drawing, get rebar shape from the polyline, and get rebar diameter, splice length etc. from this block. The relationship that links rebar polyline and rebar input block is detected by their positions.
Top rebar input block: It should be placed above the beam concrete polyline. If top rebars change, a new block should be placed over the section where the change happens. A white line drawn by the app shows relationship between this block and the rebar.
Bottom rebar input block: It should be placed below the beam concrete polyline. If bottom rebars change, a new block should be placed below the section where the change happens. A white line drawn by the app shows relationship between this and the rebar.
Middle rebar input block: It should be placed over the middle rebar so the app can easily detect their relationship.
5. Beam Section Input
Beam Section Input stores information about the concrete beam's width and rebar covers. Beam height is not included because its height (or varying height) is already defined by the beam's elevation polyline.
If beam width and/or covers change, place a new Beam Section Input block over position where the change happens.
6. Columns are Input Pier blocks
Pier should be drawn using "Input Pier" dynamic block. This pier can have special ties at 2 sides, defined by SPECIALTIE attribute.
This dynamic block needs some special focus:
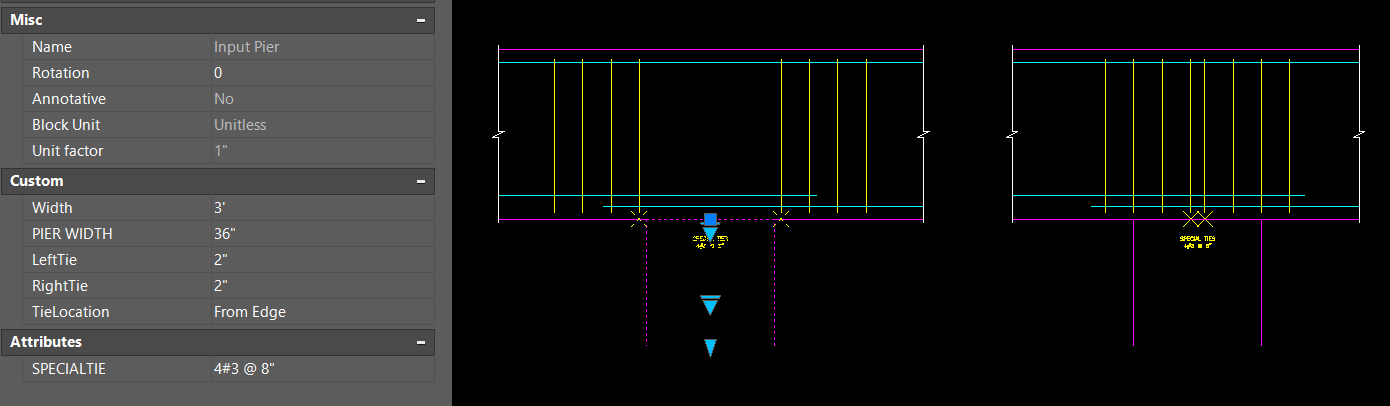
It has 1 attribute: SPECIALTIE. In above example, specialtie is 4#3 @ 8":
Pier has dynamic block properties:
7. Input Tie block for tie and stirrup rebars
Input Tie blocks are for tie and stirrup rebars. It has CALLOUT and BENDING-TYPE attributes. Shape dimensions will be automatically generated later after you click Detail Beam button.
The syntax of CALLOUT is similar to callout in Rebar Callout block, or special tie an pier.
Bending type should be T1, T2, S1, S2, S3, S7, S8 or S9. Other bending types are not supported.
If tie rebar varies, copy and place other Input Tie block along the beam.
After runNing thr "Draft Beam" command, you can note there are |----| |-------|----------| |-----| lines drawn below and along the beam.
These lines show how the app "knows" that beam has many sections. One each section, the height is unchanged. Each section have its own section input, rebar inputs, tie input block found within its range. If not, it finds the nearest one to the left or to the right.
Go back to the Drafting Canvas